| Tasks | Summary Tasks | Dates | Dependencies | Milestones |
| Baseline | Colors | Collaboration | Expenses | Assign Tasks |
Our Gantt is a powerful tool for managing your waterfall projects. The Gantt chart lets you manage complex, structured, date-driven projects. In addition, the Gantt is the only view where you can add advanced features such as summary tasks, dependencies, milestones and cost. There are also some features that you can see exclusively from the Gantt such as WBS.
Here are a few reasons why you may choose to create a project in the Gantt:
-
You prefer to see a visual timeline of your project
-
Your project is driven by dates
-
You'd like to add summary tasks to a project so you can easily see how the phases of your project are progressing
-
You would like to use Gantt-specific features such as dependencies, custom columns, critical path and measure variance
1. Enter Your Tasks
To start building your project, you will want to list out the tasks that you need to complete your project. Don’t worry, you can always edit this list later or add more tasks by clicking the Add Task button.
The Gantt is the only view in the software that tasks need to be listed out in order from start to finish. Once you populate your project in the Gantt, it can be managed in the List and the Board while the structure of the Gantt remains the same.
The Gantt is designed to be a date-driven, structured plan. If your tasks are not listed in order, you will run into issues with the relationships of the tasks once you start adding dependencies, which will be helpful later in case dates slip. Let’s take a very simple example:
Task 1- Planned Finish of 1/1/2025
Task 2- Planned Finish of 12/31/2024
When you link these tasks from finish to start, the software will automatically adjust the second task so that it begins after the first task ends. This is the parameter of the finish-to-start dependency.

2. Summary Tasks
Once you have your tasks listed in your new project, you can add summary tasks. Summary tasks are useful because all subtasks will roll into the summary task. For example, say you have "planning" listed out as a summary task with several tasks below. By adding a summary task, you can see the totals for all of the subtasks listed next to the summary task which is indicated in bold.
The following columns will roll up into the summary task:
-
Planned start date
-
Planned finish date
-
Planned duration
-
Planned resource cost
-
Percent complete
-
Actual start
-
Actual finish
- Actual hours
-
Planned hours
-
Actual cost
-
Planned cost
-
Actual resource cost
-
Remaining hours

Got questions? Join a live demo this week to get a real-time walkthrough of ProjectManager and get your questions answered in a Q&A session.
3. Change Dates
You will notice that the planned start and finish dates populate automatically with today’s date as you add tasks. You will want to change these dates next. The planned start and finish dates are meant to be an estimate of when a task will begin and end. You will notice that the duration populates automatically which tells you how long the task is scheduled for.
You can also change the planned start and finish by dragging and dropping on the Gantt. Simply find the task in the Gantt and drag it until you have placed the bar at the desired date. This is a great option if you prefer to think about duration instead of dates.

4. Add Dependencies
Next, let’s add some dependencies. If you add a dependency between two tasks, the task will update automatically based on the relationship when a planned start or finish date is updated. Adding dependencies now will save you time later because you won’t have to remember the relationships between tasks. Dependencies also allow you to see your critical path.
You can drag and drop in the Gantt to create a finish-to-start dependency which is the default link type. You can also use the link button to create start-to-start, finish-to-finish or start-to-finish dependencies. You'll notice that the linked to and linked from columns update automatically as you add dependencies.

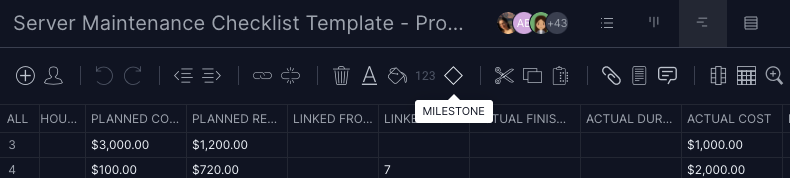
5. Add Milestones
Milestones are tasks that are typically one day in duration. They are crucial to see the most important dates in your project plan. Milestones can also be referred to as checkpoints in a project or dates that control the success of your entire project. Highlight a task that you would like to make a milestone and click the milestone button. You will notice that the taskbar on the Gantt will change to a diamond.
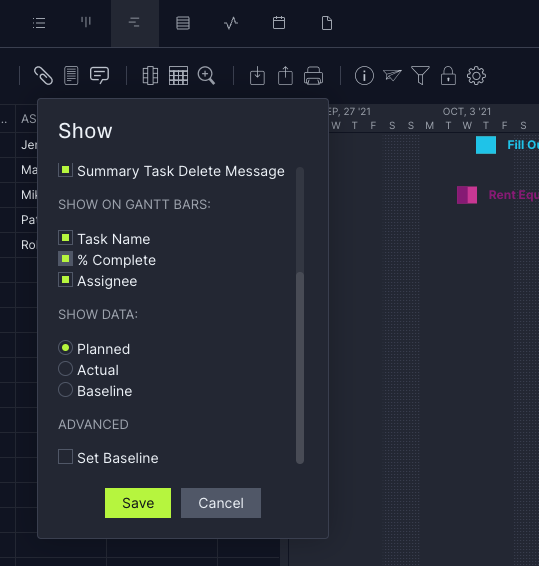
Changes are inevitable in any project. Let’s set a baseline now to save your original planned start and finish dates before your project begins. Click the Gantt settings gear icon to the right of the lock button (you may need to scroll down within the popup). Click "set baseline" to save your original dates so you can run a variance report at the end of your project.
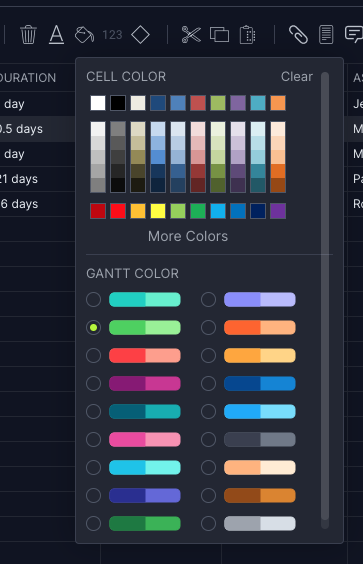
7. Add Colors
You may want to add colors to the Gantt to make it easier to read. This is especially true if your project is fairly complex! There are lots of different options to make the Gantt personalized to you.
You may want to try changing the colors of the Gantt first. Select a task that you would like to change. Click the color icon to the right of the delete icon. The colors on the bottom of the pop-up, under Gantt Color, will change the Gantt bars. If you select a summary task, all of the subtasks will also change color.
You can also change the colors and format of the tasks on the data graph. You can underline, bold or italicize a task, change the text color or change the background color.
8. Collaborate!
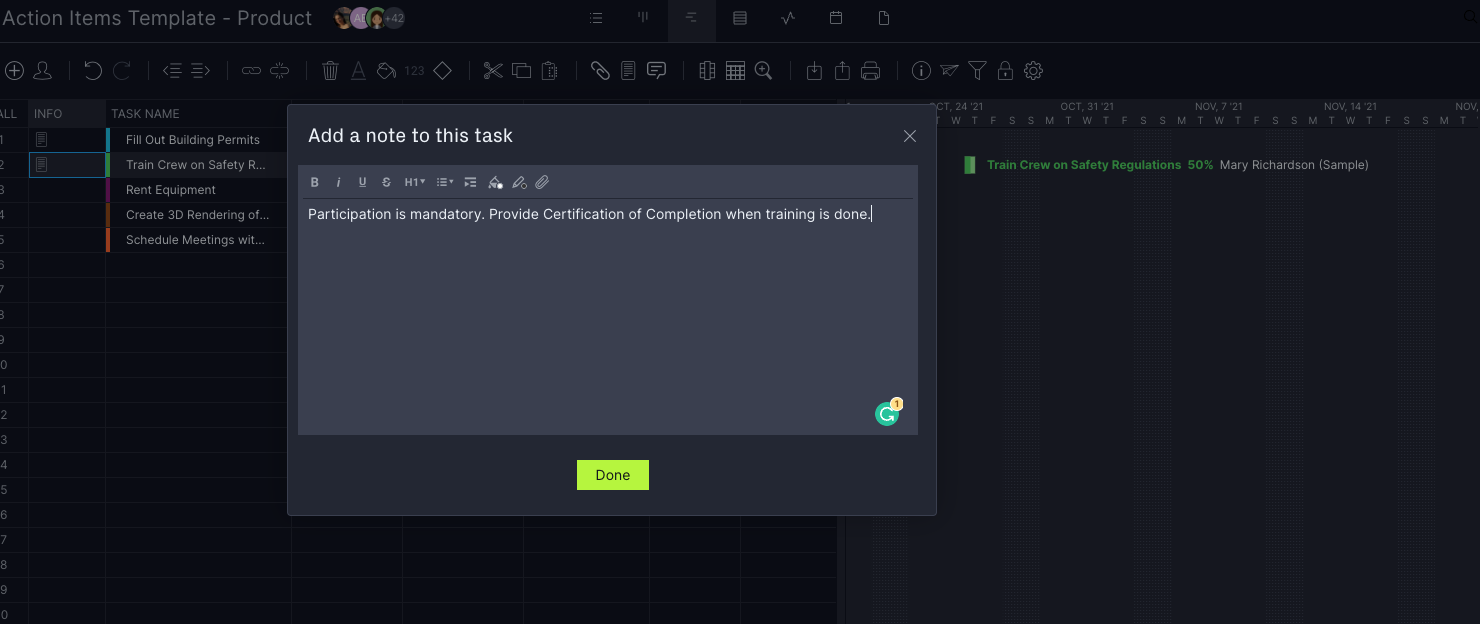
Do you ever lose important instructions, descriptions, communication or files in email, chat or in other software like Confluence or Sharepoint? If you collaborate in the Gantt, you can also view files, notes and comments in the Board or List section. This is what makes our software so powerful!
We recommend adding any files, notes or comments that you know your team may need before assigning tasks. Your team will be set up for success before your project even starts!
If you add a file, note or comment, it will appear in the info column on the Gantt. These assets will also appear on the Task Card to allow access in other project views.
9. Add Custom Columns
You may need to add a custom column to your project depending on your project requirements. Some of our customers use custom columns to track an additional currency, a Jira link, a PO number and more. We have six types of columns that you can add. If you add a custom column to one project, it will not be global because we know that every project in your portfolio will have different requirements.
10. Expenses
We have four types of expenses: planned resource cost, actual resource cost, planned cost and actual cost.
- Resource cost is used to track the cost of the team members you have assigned to tasks using an hourly rate.
- Planned and actual cost is used to track the amount of money spent on supplies, equipment, travel and any other expenses that are not tied to a resource.
If you plan on using planned and actual resource costs, make sure you add an hourly rate to each profile on the manage users page.
You will see the planned resource cost populate once you assign hours to a team member and the actual resource cost populate as the team member logs hours.
The planned cost will be entered by you as an estimate of the amount that you are planning to spend per task. You'll enter the actual cost later as you finalize your expenses.

The final step is to assign tasks to your team! You may already have your team’s profiles created on the manage users page. You will see all team members listed when you click into the assigned column for a task.

There are a couple of things to keep in mind when assigning a task. You'll want to ask yourself:
- Do you want to assign tasks by the number of hours? First, set up the availability and working hours for your resources in the holidays section. Next, click the team member that you wish to assign and the number of assigned hours will populate. Click save to confirm.
- Do you want to populate a Planned Resource Cost? You must assign tasks by the number of hours for the Planned Resource Cost to populate. You just need to make sure that your resources have an hourly rate attached to their profile and then assign hours as normal.
- Do you want to assign tasks to your team without hours? Simply click the team member that you wish to assign and make sure that the assigned hours are set to 0. If you haven’t set up working hours and availability in the Holidays section, the assigned hours won’t populate.
Looking for more Gantt chart articles? Visit the Gantt chart category.
We're Here to Help
In the case that you have questions on how to set up a Gantt chart or need additional guidance, please email us at support@projectmanager.com.