---
title: Resource Management Overview
description: Resource management is integrated into scheduling and execution, offering insights into costs, hours and workload
---
[Skip to content](https://learn.projectmanager.com/introduction-to-resource-management#main-content)
- [English](https://learn.projectmanager.com/introduction-to-resource-management)
- [Deutsch](https://learn.projectmanager.com/de/introduction-to-resource-management)
- [Español](https://learn.projectmanager.com/es/introduccion-a-la-gestion-de-recursos)
- [Français](https://learn.projectmanager.com/fr/introduction-to-resource-management)
English
Show submenu for translations
[Ask a Question](https://learn.projectmanager.com/kb-tickets/new)

- [ProjectManager Knowledge Base](https://learn.projectmanager.com/)
Open main navigation
Close main navigation
- [ProjectManager Knowledge Base](https://learn.projectmanager.com/)
- - [English](https://learn.projectmanager.com/introduction-to-resource-management)
- [Deutsch](https://learn.projectmanager.com/de/introduction-to-resource-management)
- [Español](https://learn.projectmanager.com/es/introduccion-a-la-gestion-de-recursos)
- [Français](https://learn.projectmanager.com/fr/introduction-to-resource-management)
English
Show submenu for translations
- [Ask a Question](https://learn.projectmanager.com/kb-tickets/new)
How can we help you today?
- There are no suggestions because the search field is empty.
1. [ProjectManager Knowledge Base](https://learn.projectmanager.com/)
2. [Resource management](https://learn.projectmanager.com/resource-management)
3. [Resource Availability](https://learn.projectmanager.com/resource-management#resource-availability)
# Resource Management Overview
## Resource management is integrated into scheduling and execution, offering insights into costs, hours and workload
Resource management features are only on Business and above. [Learn more](https://www.projectmanager.com/pricing).
### Resource Management Summary: Benefits & Functions
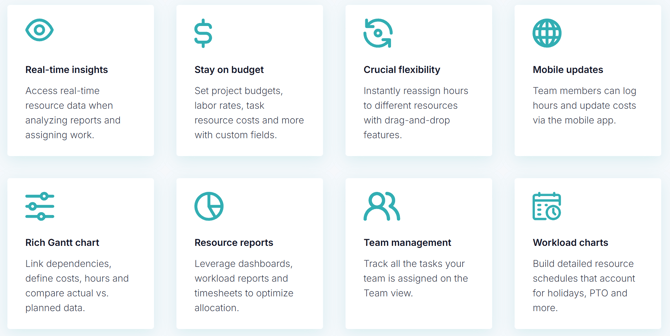
Resource management in ProjectManager includes:
- Human and non-human resources
- Planned vs. actual resource costs based on labor rates
- Workload assignments by team member
- Time tracking for tasks via timesheets and individual task data
Resource planning and management is best executed in three different features, the Gantt chart, team page and workload page.
- The team page breaks down project tasks by team member, allowing you to instantly drag and drop assignments.
- The workload page allows you to do advanced, long-term resource scheduling, reducing bottlenecks down the line during execution.
- The Gantt chart offers real-time resource availability insights, planned resource hours and planned resource costs.
Resource data entered in one view appears in all other views, dashboards and reports.
**Tip:** Be sure to enter actual data for hours and costs. That way you can compare those figures against planned data, helping you better manage your resources.
### How to Manage Task Workload with the [Team Page](https://learn.projectmanager.com/team-page)
The team page shows the distribution of tasks assigned across your portfolio. It also allows you to view a team member’s profile and add them to teams. Unlike workload, the team section doesn’t require you to use planned effort to get a distribution of task allocation.
Instead, the team section takes into account the priority of tasks and shows this information visually on a daily or weekly view. It is easy to see the number of tasks assigned and the priority of those tasks.
You can even drag and drop to reassign a task and add new tasks in the same view. If you want to see assigned and logged hours, turn on the columns on the right side of the page.
On the right side of the team page, you'll see a graph that includes the number of tasks and priority levels. If you mark a task complete, a checkmark will appear. The team page is useful if you want to see not only what your team is working on, but also what was completed in a given timeframe.
### Workload Planning Video
If you can see what your team is working on, you can see who is over-allocated, who may be able to take on more work and who is out of the office. ProjectManager offers many resource management and resource scheduling tools and features to empower you to accurately track resources in one place.
To get started, watch our helpful video on resource management below.
### Managing Human Resources
There are two ways to see what your team is working on.
- You can use the [workload page](https://learn.projectmanager.com/workload) if portfolio features are a part of your plan and you are defining the planned effort when assigning tasks.
- If you are not using planned effort to assign tasks, you can see assigned tasks across your portfolio on the [team page](https://learn.projectmanager.com/team-page).
### [The Workload Page](https://learn.projectmanager.com/workload)
Our workload feature is only on Business and above, [learn more.](http://app.projectmanager.com/go/pricing)
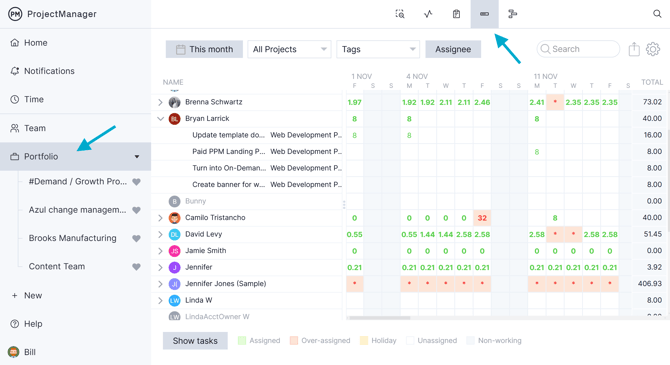
To access the workload page, click on "portfolio" on the left-hand menu. Then click on the "workload" icon as demonstrated below.
#### Revealing Tasks & Reassigning Work
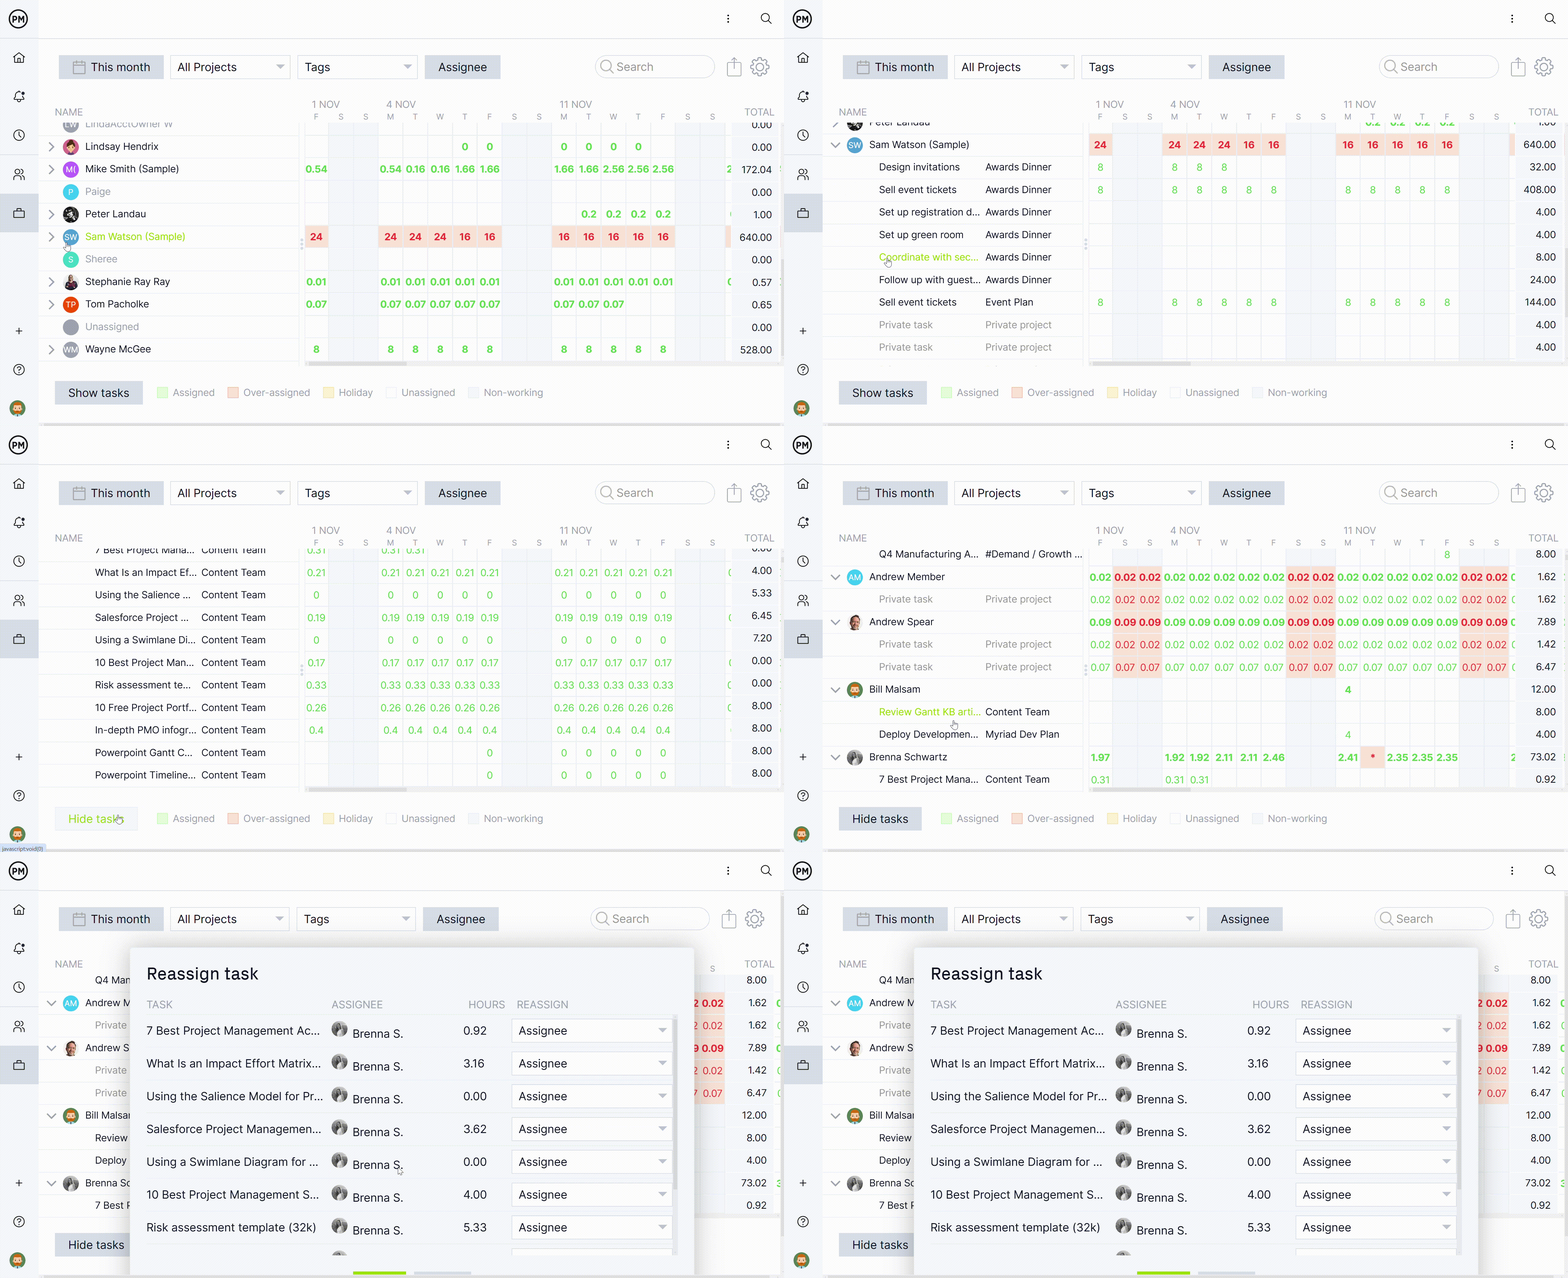
You'll then be able to see the full workload page. Simply scroll to the individual of choice and expand or collapse the tasks on their plate by using the small arrow next to the name.
If you want to reassign a task, simply click the cell and choose a different name from the drop-down.
If you are not currently part of all projects within your team, you may not have access to see task details. To see these details, you'll need to be added to the project.
**Got questions?** **[Join a live demo](https://www.projectmanager.com/product-demos?utm_campaign=weekly-demo&utm_medium=knowledge-base)** this week to get a real-time walkthrough of ProjectManager and get your questions answered in a Q&A session.
#### Hourly Workload & Managing Rates
ProjectManager offers industry-leading cost management for serious project managers:
- **Plan ahead** - All rates can be scheduled to change on a specific date.
- **Data integrity** - Editing rates does not alter costs on closed projects.
- **Projections** - See how different resources affect task costs in real time.
- **Flexibility** - Create unique rates for external contractors or consultants.
- **Accuracy** - Planned and actual costs automatically adjust with scheduled changes.
The [rates page](https://learn.projectmanager.com/hourly-rates) allows you to manage all your rates and effective dates. Click on your name in the bottom left \> Users & Teams \> Hourly Rates.
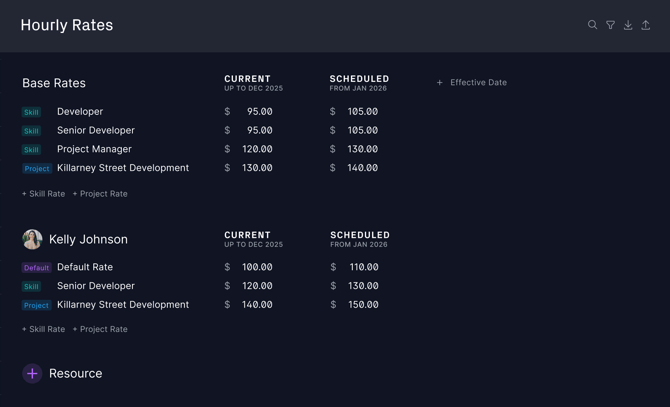
**Note:** You can only access the Rates page if you have the "see hourly rates, costs & budgets" role setting. Admins and Global Admins have this setting by default. You can also create a custom role for more granular control.
When a project rate is set, it will override all resource base rates, allowing you to give a project a fixed rate regardless of who does the work. If you prefer the previous way of working, simply give your resources a dedicated rate for that particular project.
Our workload feature allows you to **see assigned hours across your entire portfolio**. The workload page is a great view for project planning, especially if you have a project that requires a fixed amount of resources.
If you’ve assigned hours to your team on the Gantt, board or list, you will see hours or planned effort appear on the workload page. The software will automatically divide the number of hours evenly across the task duration.
#### Color-Coded Insights for Easy Decisions
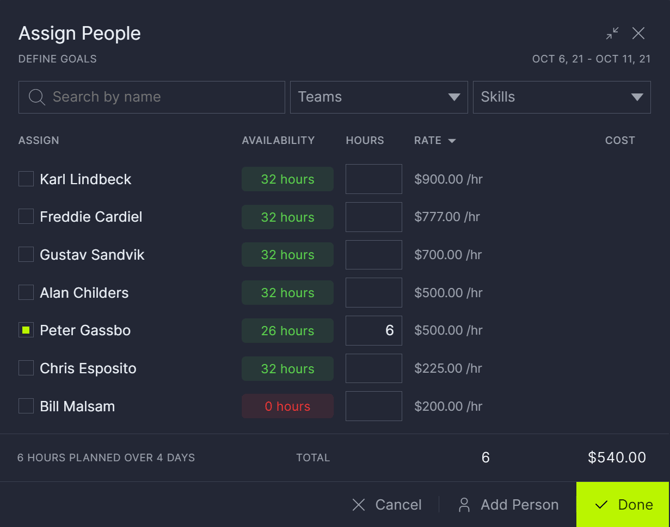
On the workload page, you can drill into this data by team, month or project. If you navigate to the page, you will see that it is color-coded for easy viewing. For example, if you see red on the workload page, it means that the team member is over-assigned for that day based on their working hours.
If you see over-allocation, consider moving the task to another team member with the same set of skills who's available to work.
### Managing Workload on the Gantt
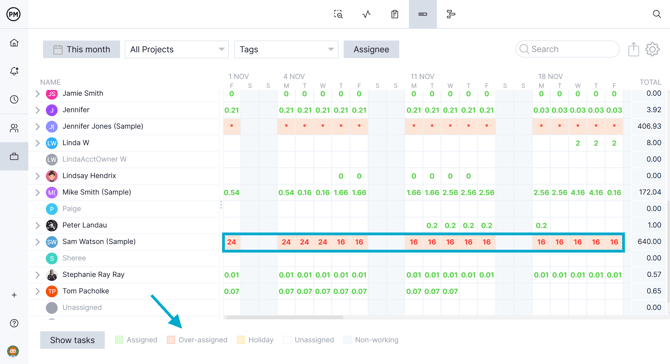
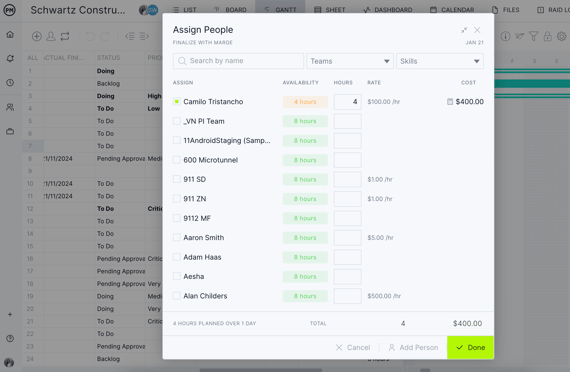
If you are using the [Gantt](https://learn.projectmanager.com/the-gantt), you will be able to see availability when assigning tasks, so you can then use the workload page as a double-check. You can still assign tasks using the Board or the List, but you won’t be able to see availability like in the Gantt.
### Allocating Planned Effort
Our robust resource management features let you plan hours in the Gantt, board, list and even the calendar. You may want to use planned effort if you plan to use the workload page to see how hours are allocated across your portfolio or are looking to track certain metrics, like billable time. You can easily plan hours in your preferred view as well as see logged hours.
When assigning a resource to a task, the system will default to assigning the LESSER of:
- The remaining unassigned hours on the task (Planned Effort - any hours assigned to other resources), OR
- The resource’s availability for the duration of the task.
This means if a resource is available for 40 hours during the 5-day duration of this task, but the Planned Effort is only 10 hours, the default value for the assignment will be 10 hours.
**Note:** The default can still be modified by the user at the time of the assignment.
Likewise, if the Planned Effort is 10 hours, but another resource has already been assigned for 2 hours, this resource will default to 8 hours (the remaining unassigned portion of the Planned Effort.
If the new resource is assigned for less than the remaining unassigned portion of the Planned Effort (either because the resource is not available for the full portion, or because the user manually reduced the number of assigned hours), the system will no longer adjust the Planned Effort to match the reduced assignment.
In this case, the Planned Effort will remain the same, and the user is free to assign another resource to account for the remaining unassigned hours.
If, however, the user manually adjusts the assigned hours for this resource, such that the total assigned hours ***exceeds*** the previous Planned Effort, the system will automatically adjust the Planned Effort to match the total of the assigned hours.
### Managing Resources on Different Project Views
#### Gantt
If you plan hours in the [Gantt view](https://learn.projectmanager.com/the-gantt), you can utilize the availability popup that is not available on other views. The availability popup shows you the available hours that a user has for the duration of the task, accounting for scheduled time out of the office and hours already scheduled on other tasks.
If a user is unavailable, you can hover over their availability and see the other tasks they are assigned to. The available hours for each user are based on the working days and default planned hours set under the holidays tab under "users and teams."
To assign hours in the Gantt, navigate to the assigned column. If you don’t see the assigned column, turn it on by clicking the manage columns button next to the small calendar button at the top. Click the cell in line with the task you wish to assign and find the user’s name. You can search, scroll by name or select teams and skills to filter the list.
To assign a user, check the box next to the user's name and you'll see the planned hours automatically populate.
**Note:** This will only happen if you have set up the Default Planned Hours from the holidays pop-up. If you don't have the Default Planned Hours set, you need to manually type in the number of hours you plan to assign to that user.
If you select multiple users, the software will assign both users an equal amount of hours.
You can edit the number of hours assigned by typing into the assigned box. Finally, click save and you will be able to see the hours populate in the planned hours Gantt column for that task.
#### Board
You can assign hours on the [board](https://learn.projectmanager.com/project-board) by clicking on a card and expanding it to full view. You will add estimated hours under the planned field. Click on the actual hours section of the card to see an additional time popup with actual hours per assignee.
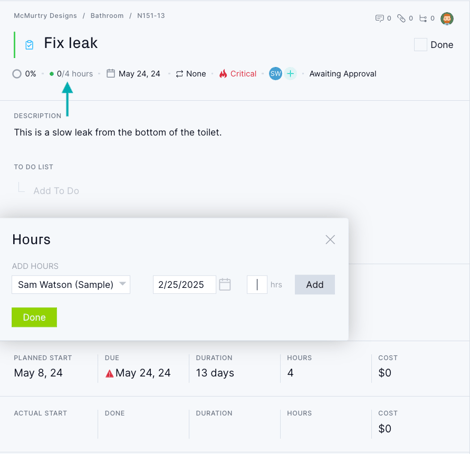
If you assign estimated hours on the board, you won't see the availability popup appear like the Gantt view.
Once you enter hours in the planned field on the board, you can see the hours on the Gantt, list or calendar without having to enter the information twice. You can also see the planned effort in various areas of the software, including the team, workload, roadmap and reports pages.
#### List
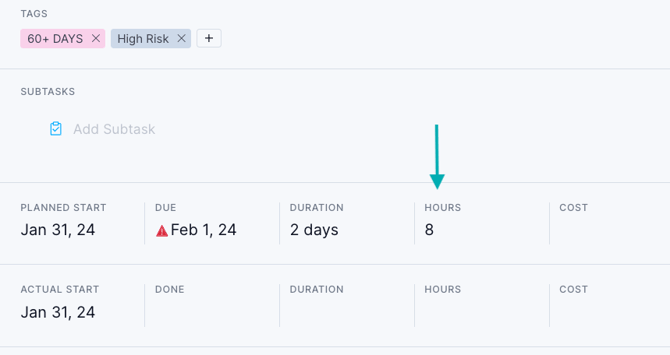
Assigning hours on the [list](https://learn.projectmanager.com/project-list) is similar to using the board. If you navigate to the list, click a task name to expand the task into full view.
Once the task is expanded, enter your estimated effort in the planned field. Once hours are entered, you can see the planned effort throughout the software.
#### Calendar
The [calendar](https://learn.projectmanager.com/project-calendar) is a great tool for seeing your project plan across a calendar view and adding new tasks, moving tasks and using advanced features like resource management. To add planned effort to a task, click the task to open the task card.
Once the task is expanded, enter your estimated effort in the planned hours field. Once hours are entered here, you can see the planned effort throughout the software.
#### Sheet
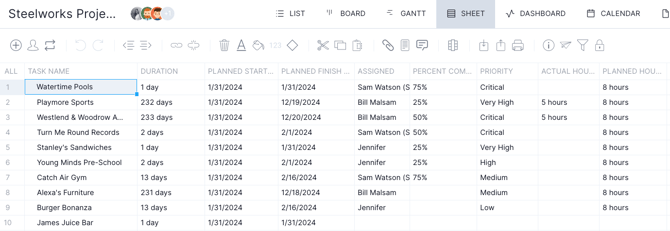
Use the [sheet view](https://learn.projectmanager.com/sheet-view) to keep track of your resources in a customizable grid format. You can use the sheet to keep track of individual project resources or your entire portfolio of projects.
The sheet has customizable columns to map your planned start and finish dates in addition to your actual vs. planned hours. Feel free to enable columns such as "actual cost" to better keep track of your resources directly from the sheet view.
### ProjectManager's Resource Planning Tools
Here are some other ways to keep track of your project resources.
- Use [timesheets](https://learn.projectmanager.com/timesheets) to keep track of logged time across teams and projects
- Reference [project dashboards](https://learn.projectmanager.com/project-dashboard) and [portfolio dashboards](https://learn.projectmanager.com/portfolio-dashboard) that automatically update in real time and reflect data on cost, workload, etc.
- Generate [reports](https://learn.projectmanager.com/quick-introduction-to-reports) on workload, availability, timesheets and tasks to better manage your resources
Dig deeper into resource management and watch our Listen & Learn below.
### Contact Support with Any Questions on Resource Management!
We understand the importance of closely tracking your resources. If you have questions on resource management, please email support@projectmanager.com.
- [Training walkthroughs](https://learn.projectmanager.com/training-walkthroughs#main-content)
- [Setting Up Your Account](https://learn.projectmanager.com/training-walkthroughs#setting-up-your-account)
- [Resource Management](https://learn.projectmanager.com/training-walkthroughs#resource-management)
- [Team Management](https://learn.projectmanager.com/training-walkthroughs#team-management)
- [Gantt Chart](https://learn.projectmanager.com/training-walkthroughs#gantt-chart)
- [Dashboards](https://learn.projectmanager.com/training-walkthroughs#dashboards)
- [Portfolio Management](https://learn.projectmanager.com/training-walkthroughs#portfolio-management)
- [Integrations](https://learn.projectmanager.com/training-walkthroughs#integrations)
- [Getting started](https://learn.projectmanager.com/getting-started#main-content)
- [Software Basics](https://learn.projectmanager.com/getting-started#software-basics)
- [Account Basics](https://learn.projectmanager.com/getting-started#account-basics)
- [Making Your First Project](https://learn.projectmanager.com/getting-started#making-your-first-project)
- [Preferences & Notifications](https://learn.projectmanager.com/getting-started#preferences-notifications)
- [Managing projects](https://learn.projectmanager.com/managing-projects#main-content)
- [Project Management](https://learn.projectmanager.com/managing-projects#project-management)
- [Project Settings](https://learn.projectmanager.com/managing-projects#project-settings)
- [Templates, Imports & Exports](https://learn.projectmanager.com/managing-projects#templates-imports-exports)
- [Project views](https://learn.projectmanager.com/project-views#main-content)
- [Our Project Views](https://learn.projectmanager.com/project-views#our-project-views)
- [List, Board & Calendar Views](https://learn.projectmanager.com/project-views#list-board-calendar-views)
- [Gantt View](https://learn.projectmanager.com/project-views#gantt-view)
- [Sheet View](https://learn.projectmanager.com/project-views#sheet-view)
- [Risk View](https://learn.projectmanager.com/project-views#risk-view)
- [Tasks & teams](https://learn.projectmanager.com/tasks-teams#main-content)
- [Task Management Basics](https://learn.projectmanager.com/tasks-teams#task-management-basics)
- [Advanced Task Management](https://learn.projectmanager.com/tasks-teams#advanced-task-management)
- [Team Organization](https://learn.projectmanager.com/tasks-teams#team-organization)
- [Team Management](https://learn.projectmanager.com/tasks-teams#team-management)
- [Resource management](https://learn.projectmanager.com/resource-management#main-content)
- [Resource Availability](https://learn.projectmanager.com/resource-management#resource-availability)
- [Time Management](https://learn.projectmanager.com/resource-management#time-management)
- [Dashboards, reports & PPM](https://learn.projectmanager.com/dashboards-reports-ppm#main-content)
- [Dashboards](https://learn.projectmanager.com/dashboards-reports-ppm#dashboards)
- [Project Portfolio Management](https://learn.projectmanager.com/dashboards-reports-ppm#project-portfolio-management)
- [Reports](https://learn.projectmanager.com/dashboards-reports-ppm#reports)
- [Account, security & users](https://learn.projectmanager.com/account-security-users#main-content)
- [Account and Project Security](https://learn.projectmanager.com/account-security-users#account-and-project-security)
- [User Management](https://learn.projectmanager.com/account-security-users#user-management)
- [Account Management](https://learn.projectmanager.com/account-security-users#account-management)
- [Integrations](https://learn.projectmanager.com/integrations#main-content)
- [ERP / Accounting](https://learn.projectmanager.com/integrations#erp-accounting)
- [Collaboration](https://learn.projectmanager.com/integrations#collaboration)
- [Development](https://learn.projectmanager.com/integrations#development)
- [Analytics](https://learn.projectmanager.com/integrations#analytics)
- [API](https://learn.projectmanager.com/integrations#api)
- [Customer resources](https://learn.projectmanager.com/customer-resources#main-content)
- [Training Academy](https://learn.projectmanager.com/customer-resources#training-academy)
- [Listen & Learn Videos](https://learn.projectmanager.com/customer-resources#listen-learn-videos)
- [By industry](https://learn.projectmanager.com/by-industry#main-content)
- [Construction](https://learn.projectmanager.com/by-industry#construction)
- [Manufacturing](https://learn.projectmanager.com/by-industry#manufacturing)
- [Professional Services](https://learn.projectmanager.com/by-industry#professional-services)
- [Latest releases](https://learn.projectmanager.com/latest-releases#main-content)
- [Phased Releases](https://learn.projectmanager.com/latest-releases#phased-releases)
- [2026 Releases](https://learn.projectmanager.com/latest-releases#2026-releases)
- [2025 Releases](https://learn.projectmanager.com/latest-releases#2025-releases)
- [2024 Releases](https://learn.projectmanager.com/latest-releases#2024-releases)
- [2023 Releases](https://learn.projectmanager.com/latest-releases#2023-releases)
- [2022 Releases](https://learn.projectmanager.com/latest-releases#2022-releases)
- [Mobile app](https://learn.projectmanager.com/mobile-app)
[](https://www.projectmanager.com)
Get organized. Do amazing things.
[mailto:support@projectmanager.com](mailto:support@projectmanager.com)
[Login](https://software.projectmanager.com/login) | [Ask a Question](https://learn.projectmanager.com/kb-tickets/new) | [Tutorial Videos](https://www.projectmanager.com/product-videos)
```json
{
"@context" : "https://schema.org",
"@type" : "VideoObject",
"caption" : {
"@type" : "MediaObject",
"contentUrl" : "https://learn.projectmanager.com/media-transcripts/82815086261/en.vtt",
"inLanguage" : "en",
"name" : "en Captions"
},
"contentUrl" : "https://6111124.fs1.hubspotusercontent-na1.net/hubfs/6111124/Redesign%202022/Videos/*Team%20View.mp4",
"dateModified" : "2026-06-03T20:00:38.167Z",
"duration" : "PT2M0.567S",
"height" : 2160,
"name" : "*Team View",
"thumbnailUrl" : "https://6111124.fs1.hubspotusercontent-na1.net/hubfs/6111124/Redesign%202022/Videos/*Team%20View.mp4/medium.jpg",
"uploadDate" : "2022-08-23T20:06:43.459Z",
"width" : 3840
}
```
```json
{
"@context" : "https://schema.org",
"@type" : "VideoObject",
"caption" : {
"@type" : "MediaObject",
"contentUrl" : "https://learn.projectmanager.com/media-transcripts/82811997251/en.vtt",
"inLanguage" : "en",
"name" : "en Captions"
},
"contentUrl" : "https://6111124.fs1.hubspotusercontent-na1.net/hubfs/6111124/Redesign%202022/Videos/*Resource%20Management.mp4",
"dateModified" : "2026-06-03T20:00:10.539Z",
"duration" : "PT3M25.367S",
"height" : 2160,
"name" : "*Resource Management",
"thumbnailUrl" : "https://6111124.fs1.hubspotusercontent-na1.net/hubfs/6111124/Redesign%202022/Videos/*Resource%20Management.mp4/medium.jpg",
"uploadDate" : "2022-08-23T19:50:44.598Z",
"width" : 3840
}
```
```json
{
"@context" : "https://schema.org",
"@type" : "VideoObject",
"caption" : {
"@type" : "MediaObject",
"contentUrl" : "https://learn.projectmanager.com/media-transcripts/77745748007/en.vtt",
"inLanguage" : "en",
"name" : "en Captions"
},
"contentUrl" : "https://6111124.fs1.hubspotusercontent-na1.net/hubfs/6111124/Marketing%20Content/Customer%20Success%20Content/CS%20Listen%20and%20Learn/Listen%20&%20Learn%20Resource%20Management.mp4",
"dateModified" : "2026-06-03T19:51:09.626Z",
"duration" : "PT23M56.099S",
"height" : 1080,
"name" : "Listen & Learn Resource Management",
"thumbnailUrl" : "https://6111124.fs1.hubspotusercontent-na1.net/hubfs/6111124/Marketing%20Content/Customer%20Success%20Content/CS%20Listen%20and%20Learn/Listen%20&%20Learn%20Resource%20Management.mp4/medium.jpg",
"uploadDate" : "2022-06-28T22:00:58.174Z",
"width" : 1920
}
```