Watch our brief demo video to see how to customize columns on the Gantt or sheet.
Columns are a global setting, meaning the enabled columns will copy over to your entire portfolio.
How to Enable Columns on the Gantt & Sheet
When toggling between the Gantt and the sheet, the enabled columns don’t carry over between views. You can enable different columns on the Gantt and the sheet. For example, use the sheet for easier data entry and the Gantt for visualization.
Turn columns on or off by clicking the column icon on the sheet or Gantt ribbon or by clicking the plus button to the right of the last column.
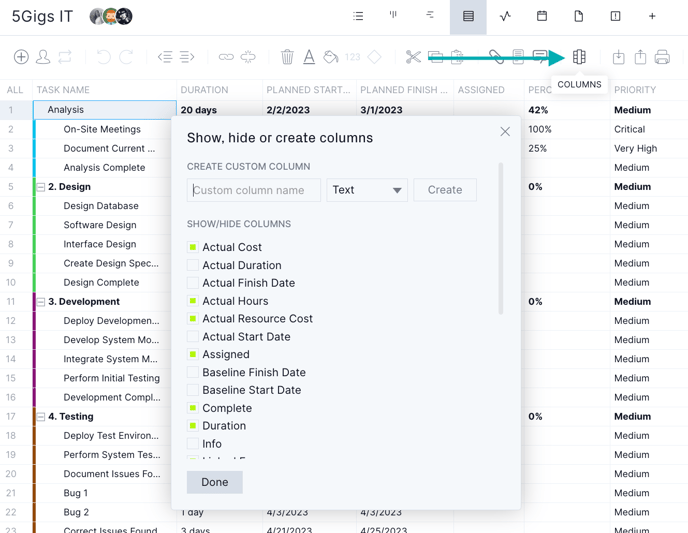
Column Definitions
You can find the definitions for each column here:
- Actual Cost: If you track expenses, input actual non-resource costs here. Once your actual cost is inputted, you can track your planned cost against your budget on the dashboards and reports.
- Actual Duration: The actual duration will be calculated automatically once the actual finish and actual start dates are populated. This column indicates the number of days that a task took to complete, including the first and last days.
- Actual Finish Date: The actual finish date will populate as today's date once a task is marked 100% complete in the board, list, Gantt or timesheet views. The actual finish date populates automatically, but it can be manually changed by typing the date or by using the date picker.
- Actual Hours: The logged hours on a task. A team member can log hours in the Gantt, board, list and timesheet.
- Actual Resource Cost: The actual resource cost populates once hours are logged in the board, list, Gantt or timesheet, assuming the hourly rate was set on the user record.
- Actual Start Date: The actual start date will populate once you change the percent complete from 0 in the board, list, Gantt or timesheet. The actual start date will be the planned start date unless changed manually. The actual start date can be manually changed by typing the date or using the date picker.
- Assigned: The resource or group of resources to which a task is assigned.
- Baseline Finish Date: The date a task was originally planned to finish. The baseline finish date can be set but can’t be manually changed. However, you can override your current baseline by deleting the current baseline and creating a new one.
- Baseline Start Date: The date that a task was originally planned to start. The baseline start date can be set but can’t be manually changed. However, you can override your current baseline by deleting the current baseline and creating a new one.
- Complete: A checkbox to indicate that a task has been marked 100% complete.
- Duration: The number of days scheduled for a task, including the first and last day. When looking at a summary task, the planned duration is defined as the number of working days between the highest-level planned start date and the planned finish date.
- Info: Displays an icon relative to the file, note or comment added to the task. If a task is pending approval, approved, denied or recurring, an icon will appear in the Info column.
- Linked From: A numerical representation of the dependency you have set shows the predecessor task.
- Linked To: A numerical representation of the dependency you have set shows the successor task.
- Milestone: The box will be checked when you have added a milestone on the Gantt.
- Percent Complete: The progress of a task in a percentage. A task will not be shown as completed until the task is marked 100% complete.
- Planned Cost: If you're tracking expenses, input your estimated non-resource costs here. Track your planned and actual costs against your budget in the dashboard and report features.
- Planned Finish Date: The estimated date a task is planned to finish. The planned finish date populates automatically as you change the duration on the Gantt. Edit the planned finish date by dragging the taskbar on the Gantt, typing the date in the cell or using the date picker.
- Planned Hours: The number of hours estimated for a task. The planned hours would populate based on the number of hours you assign a person to work on a task.
- Planned Resource Cost: The estimated resource cost for a task is based on the hours you have planned. Your planned resource cost will populate automatically based on the number of hours assigned and the user’s hourly rate.
- Planned Start Date: The estimated first day of a task is used to calculate the planned duration. The planned start date can be edited by dragging the taskbar on the Gantt, typing the date in the cell, or using the date picker.
- Priority: You can use the dropdown to change the priority level: critical, very high, high, medium, low, very low or none.
- Remaining Hours: The total amount of planned hours on a task minus any actual hours that have been logged already.
- Status: The task's board column will be displayed here to show where the task is currently located in the project workflow.
- Tags: Any tags assigned to the task are displayed here.
- Task Name: The name of a task.
- WBS: Indicates the work breakdown structure of a project.
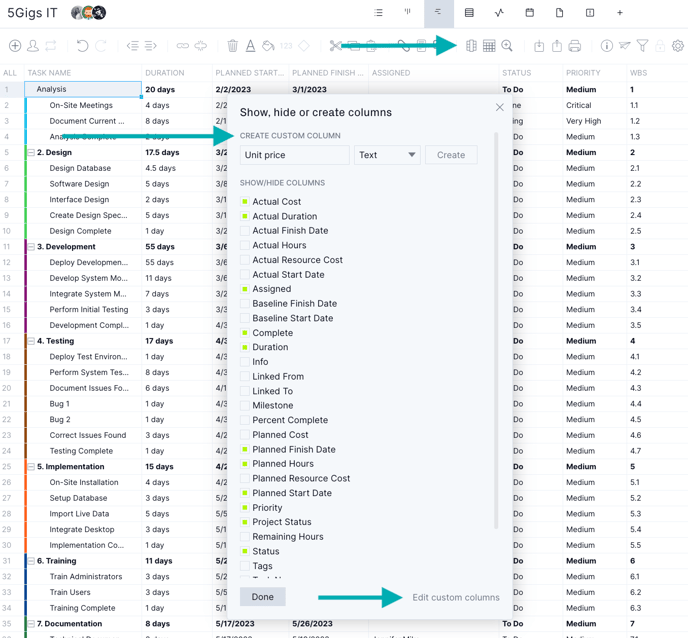
Custom Columns
You can create custom columns on the Gantt and sheet. The dropdown menu allows you to choose from six different custom column types.
Custom columns are unique to each project, so if you create a custom column in Project A, you won’t see it in Project B.
- Text: The text custom column allows you to enter text or numerical values.
- Number: The number custom column allows you to enter numerical values only.
- Date: The date custom column allows you to select a date from the date picker.
- Checkbox: A checkbox will appear in each cell when a checkbox custom column is created.
- Currency: The currency custom column allows you to enter a number with a currency symbol. The currency symbol is dictated by the default currency settings on the account popup but can be updated by changing the number formatting in the column.
- Dropdown: The dropdown custom column allows you to pick from multiple options in a list format. The dropdown custom column can be single-select or multi-select.
Column Formatting
You can format columns on the Gantt and sheet depending on their type. You can format any column, except for the following:
-
Info column
-
Task name
-
Assigned
-
Non-numeric custom column (text, checkmark and dropdown)
-
Link from and link to
-
Priority
-
Milestone
-
Tags
-
WBS
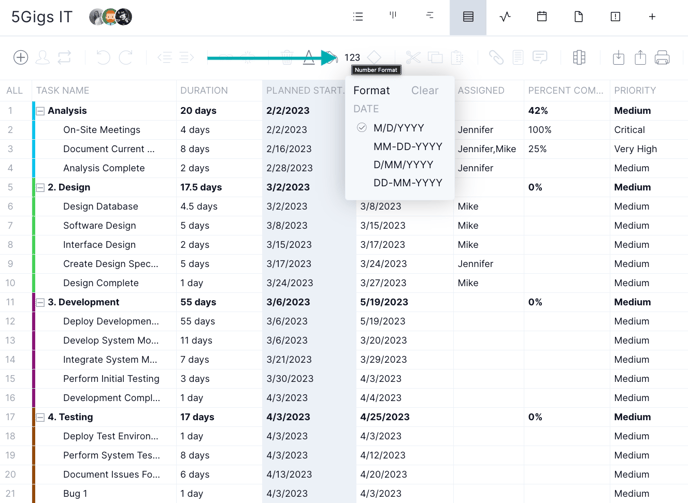
To format a numerical column, select any column that can be formatted and click the 123 icon on the Gantt ribbon or click the down arrow on a column and click the 123 icon. You'll see the decimal, percent, date or currency option depending on the type of column. For example, the date column only applies to columns where the date picker appears.
Decimal
You can show or hide the decimal point, which is the default.
Percent
You can hide the % symbol or display it, which is the default.
Date
You can select the format in which you would like to see the dates in the column. Choose between M-D-YYYY, MM/DD/YYY, D-MM-YYYY or DD/MM/YYYY.
Note: If a user changes the column formatting from the default, the changes apply per project.
Currency
Choose a default currency for all your projects in account settings. You can only have one default currency per account. However, you can change the currency type in custom currency columns.
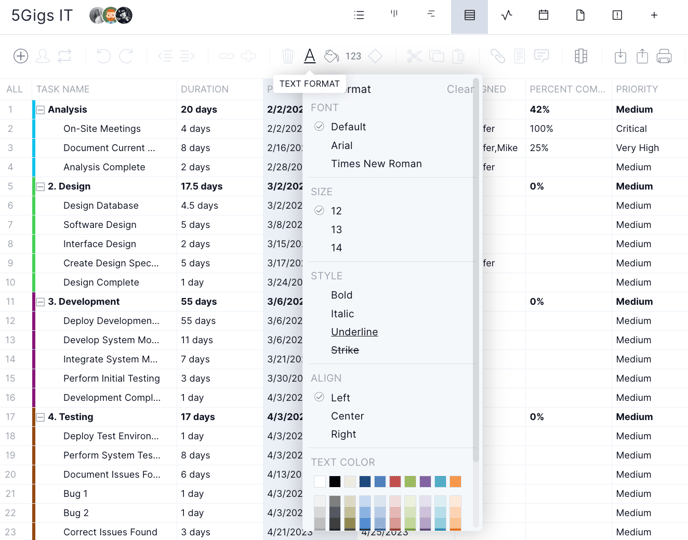
Text Formatting
Change the font, text color, alignment or style on the Gantt or sheet by clicking the A icon on the Gantt ribbon. A checkmark will appear next to your current selection.
The text formatting will apply to the entire plan if all rows are selected, or only the rows, columns or cells are selected. Summary tasks and subtasks can be formatted as well.
To change the color of the Gantt bar or cells, click the paint icon to the right of the A icon. You can also click the arrow dropdown next to any column and select the paint icon to change cells only.
Note: All project roles, including collaborator, can change the column and text formatting.
Drag to Copy
The drag-to-copy functionality allows you to copy data across multiple cells within a single column easily. To copy, follow these three steps:
-
Click on the lower right-hand corner of a cell until a blue square appears.
-
Once the cell has been selected, drag the blue square up or down to copy the data.
-
If a cell already has data in it, drag to copy will override the existing data.
You can use the drag-to-copy functionality for all the columns listed here:
-
Task name
-
Actual cost
-
Actual duration
-
Actual finish date
-
Actual start date
- Complete
-
Duration
- Milestone
-
Percent complete
-
Planned cost
-
Planned finish date
-
Planned hours
-
Planned start date
-
Priority
-
Tags
-
All custom columns (text, number, date, etc.)
Have Any Questions?
For any questions you may have on our Gantt and sheet columns, please email support@projectmanager.com.